Contact Us
- Sales: sales@todaysystems.com
- Support: support@todaysystems.com
TB0014 - Optimizing Bitmaps for Better Performance in BuildPro.
Number: TB0014
Availability: As of BuildPro 8.00 on all platforms
Introduction
It is important to optimize bitmaps used in application development. In BuildPro the specific advantages are:
-
Faster communication over dial-up or slow network connections.
- Limit of 32kb on bitmaps stored in the BuildPro Repository. It is most convenient to store bitmaps in the repository (simplifies application distribution, provides client-side caching etc).
Optimizing the file size of bitmaps does not always mean decreasing the quality of a bitmap or its size. Using simple techniques, it is possible to decrease the image size. Some of these techniques are:
-
Using BMP (RLE) compression. Compressed bitmaps contain the exact image but at a lower file size.
-
Decreasing the number of colors in an image. Reducing the number of colors in an image to 256 or only 16 will dramatically decrease the size of a bitmap. Some bitmap editors allow you to select the palette of 16 colors. This allows you to create text images in shades for blue for example that store in very small file sizes.
-
Decreasing image size. Resizing the image by just 10% can make a big difference in file size (a 10% reduction in size should decrease the file by 20%).
-
Using background colors. If an image contains a common background color, you might want to paste the image on top of colored container.
- Using text. Most high-volume web pages these days make use of colored text and backgrounds for displaying effects. A container and a text string use much less overhead (traffic and processing) to display compared to a bitmap.
See examples of these methods below. Each of these methods will have a picture of the result, which can be compared with the original:
File size: 92KB

RLE Compression.
Paint Shop Pro allows you to compress bitmaps using Run Length Encoding. This can reduce the size by approximately 25% without a noticeable loss in quality. To see how to do this click here. In the following case there has been a dramatic drop as RLE compression only allows a maximum of 256 colors so it automatically reduces the number of colors to 256 as well as compressing it.
File size: 28KB

Decrease the Number of Colors.
As you can see below by reducing the number of colors in the bitmap to 256 you can reduce the size of the file by more than 50%. reducing it to 16 can decrease it by about 80% depending on the complexity of the original picture. To see how to do this click here.
256 colors: File Size: 32KB

16 colors: File Size 16KB

Decrease Image Size.
Resizing the image by just 10% can make a big difference in file size (a 10% reduction in size should decrease the file by 20%). To see how to do this click here.
File Size: 75KB

By combining the above three methods you can greatly reduce the file size while still retaining a quality image.
File Size: 12KB

Background Colors.
Another option is to paste the picture over a background color similar to that of the bitmap by using a rectangle or container in BuildPro. By removing the background color from the bitmap and using BuildPro it can reduce the file size by a very small amount, but every little bit helps.
To create a background:
Insert a rectangle.
Resize the rectangle to suite the picture.
In Background Color or Pattern properties of the rectangle enter the color you wish in the form of <style>-<color> e.g. solid-purple. The different style you can use are: solid, fdiagonal, bdiagonal, horizontal, vertical, cross and crossdiagonal.
You can specify a custom color, which best matches, your background in the wintoday.ini or .todayrc files.
To do this enter the color and the coordinates for it in the order Red.Green.blue, e.g. purple=115.80.134 under the [Color] heading in these files.
Remember to restart the program for the changes to take effect.
Then insert the picture as shown below and place it over the rectangle by clicking and dragging it.
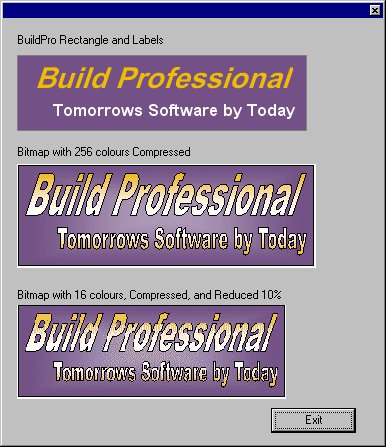
Using Text and Containers.
Another option is to use BuildPro items such as containers, rectangles and labels to create an image similar to a bitmap there by removing a bitmap altogether. This depends greatly on what the bitmap looks like. To Change the color of a label to suite put the required colors in the following fields: Text Background Color, Foreground Color and Background Color or Pattern. For Text Background Color and Foreground Color type the color you require. see above to specify custom colours and how to enter Background Colour pattern. You can also specify the font you want in the Font property in the form of <font>-[style]-<size>. E.g. Arial Bold-italic-22. You can use any windows font, and the different styles (which are optional) are italics, bold, underline and strikethrough.
Below is an example of a few different ways of showing the BuildPro logo:
Storing it in the Repository
When using files smaller than 32K it is best to store them as a blob/bitmap in the repository rather than referring to the data path where they are located. The reason for this is, when a picture is stored in the repository a copy is cached on your local machine when using the program in client server mode the first time it is used and then the next time a lot of time can be saved as the bitmap does not have to be downloaded again.
You will find the cached copy of the bitmap in the client subdirectory of BuildPro under cache named '_<application name>_<blob/bitmap name>'
This has both its advantages and disadvantages.
Some of the advantages include:
Improved response time, as the bitmaps will be cached locally.
Some of the disadvantages include:
You can only hold images up to a size of 32K.
Makes the size of your repository (S Files) larger.
If you wanted to change or update the bitmap it would have to be done via BuildPro Developer.
To store an image in the repository:
Make a note of the location of the picture.
Click on the Blob/Bitmap Icon in BuildPro Developer.
Click on Blob/Bitmap, and select Import.
Type in the full location of the image in Import Blob/Bitmap from file and press TAB. e.g. "d:\pictures\biuldpro.bmp"
This should then show a preview of the picture in the Preview section.
Clicking OK will take you back to the previous screen with a preview of the image on this screen as well.
Pressing OK or Apply will bring up a dialogue box asking for the name of the new bitmap.
Enter a name for the bitmap.
This bitmap can now be referenced in the <-> data reference section using Z-<blob name>